


Combine Rhino CAD and DeskProto CAM
The integration of Rhino CAD and DeskProto CAM makes the process easier
An exceptional value for your money can be obtained by combining the Rhino 3D CAD software and the DeskProto 3D CAM software. Rhino (Rhinoceros) is a wellknown 3D CAD program offering NURBS modeling for Windows. The program matches well with DeskProto, as both programs share the same ideas about ease-of-use and low cost.Note that DeskProto can very well be combined with any 3D CAD program, as all these programs offer STL export. Rhino is the only program offering this easy integration though.
For many DeskProto users Rhino will be interesting as companion software with their current CAD system. For many Rhino users DeskProto will be interesting as it makes prototyping easy and affordable. Many CAM packages are available: DeskProto differs as it has been created for designers instead of for moldmakers. Only those parameters are available that are absolutely needed for prototyping, so the number of choices is limited and the software is easy to learn. Quoting Rhino-trainer John Brock of Robert McNeel & Associates:
"The combination of well thought out simplified features and the unique Milling Wizards found in DeskProto, make it highly recommended for users inexperienced in CAM."
The RhinoProto combination is extremely powerful, also for more advanced users, as can be seen in the following Rhino / DeskProto example projects. More Rhino/DeskProto projects can be found in the DeskProto Gallery. Click on a picture to see the complete story:

Thin-walled Cellphone.
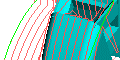
Front cover of a mobile phone, designed in Rhino, and machined as a shell model using DeskProto's Two-Sided Milling Wizard.
Front cover of a mobile phone, designed in Rhino, and machined as a shell model using DeskProto's Two-Sided Milling Wizard.

Freeformed Pudding Packaging.
Typical NURBS design. DeskProto was used for quick-and-dirty Concept Models and later also for Rapid Tooling of the pre-production test series.
Typical NURBS design. DeskProto was used for quick-and-dirty Concept Models and later also for Rapid Tooling of the pre-production test series.
Beautiful Platinum Ring.
This ring was designed in Rhino to fit a trapezoid stone and machined in wax for investment casting, using DeskProto's unique rotation axis feature.
This ring was designed in Rhino to fit a trapezoid stone and machined in wax for investment casting, using DeskProto's unique rotation axis feature.

Model Submarine.
Fascinating scale model, as this rc model can really submerge during sailing. Read the story about it's use in the Keanu Reeves movie "Sweet November".
Fascinating scale model, as this rc model can really submerge during sailing. Read the story about it's use in the Keanu Reeves movie "Sweet November".
Integration - via command Print 3-D
Rhino and DeskProto have been perfectly integrated by the Rhino command Print 3-D. This command (Rhino File menu) will open DeskProto with the current geometry automatically loaded. The command is standard available in Rhino V4 or newer, and will be initialized when Rhino finds a DeskProto on the same PC.Rapid Prototyping made really easy: just using this Rhino command Print 3-D will do the job. Now you can use DeskProto as a solution for Direct Printing !
Note: the Print-3D command in the first releases of Rhino V5 did not yet work for the new DeskProto V6.1 This has been fixed in Rhino5 SR7 (Service Release 7) (Dec 2013).
Integration - add your own CNC button to Rhino
For some applications you can best create a customized integration, which is really easy in Rhino. This will prove to be very handy when your products are all similar and can be created using the same DeskProto parameters. Products like insoles, ear plugs, rings, etc: each product is unique, however for DeskProto the settings can be identical.Warning: the information below is meant only for users with some programming experience !
What you need to do is enter the required settings as DeskProto default parameters (Options menu). You can apply multiple operations in the default part. Then you can create a button in Rhino that saves the current geometry as STL, opens DeskProto, automatically loads that STL, calculates and saves the toolpaths and again closes. No user-interaction required at all: easier is not possible :-)
How to add a CNC button to Rhino V4:
- In Rhino, select Tools > Toolbar Layout...
- In the list of toolbars (the lower edit field) all visible toolbars will be checked
- Click on the toolbar that you need (we used toolbar Main1) to make it's line blue
- Now in this small Window click Toolbar > Add button: an (empty) button will appear
- Close the small Toolbar window
(you can again delete the button: cursor over the button, press and hold the Shift key, press the left mouse key and drag the button outside the toolbar area)
- Edit the new button: cursor over the button, press and hold the Shift key, press right mouse key to open the Edit Toolbar button dialog
- Create a bitmap, a left tooltip ("Create NC file") and/or a button text as desired
- As Left mouse button command, add:
'_SelAll enter
-_Export "C:\temp\temp.stl" _enter _enter
_run "C:\Program Files\DeskProto 6.0\dp.exe C:\temp\temp.stl C:\temp\toolpaths"
How to add a CNC button to Rhino V5:
- In Rhino, select Tools > Toolbar Layout...
- Now in the Rhino Options dialog click Tools > Workspace Editor... and select tab Groups
- In the list of Toolbars click on the toolbar that you need (we choose Main for the left side bar) to make it's line blue. All buttons in this toolbar will be shown in the Toolbar field
- On the right side of the Workspace Editor window add a new Macro
- Enter a Name, three text fields, a tooltip (we used "Create NC file" for all) and add a bitmap
- As Script, enter:
'_SelAll enter
-_Export "C:\temp\temp.stl" _enter _enter
_run "C:\Program Files\DeskProto 6.0\dp.exe C:\temp\temp.stl C:\temp\toolpaths"
- Drag this new Macro to the Toolbar field: a button will be added
(you can again delete the button: cursor over the button, press and hold the Shift key, press the left mouse key and drag the button outside the toolbar area)
- Close the Workspace editor and the Rhino Options dialog
The first line of the script selects all geometry, the second line saves it as STL (two enters to apply the default export settings), the third line starts DeskProto with two command line parameters: the first is the STL file to open, the second is the NC file to create. For the latter no extension is needed: DeskProto will add the correct extension for your machine.
The single quote, dash and underscore may not be omitted.
Change the file specifications as needed.
In-between the two _enter commands you can add a whole number between 0 and 100 to set the mesh density. Default value is 50.
This script always uses the same STL filename, so when you use the button for a second project, the first STL file will be deleted.
To start DeskProto V6.1 you need to call deskproto.exe (instead of dp.exe for V6.0).
Omitting the second command line parameter will make DeskProto just start and load the STL file.
You can of course also make this button start your control software. For more information en adding toolbar buttons see the Rhino Help file.